

Kivyで日本、イギリス、アメリカの現在時刻を取得するアプリを作成してみました。
この記事の対象
行ったこと
Kivyで日本、イギリス、アメリカの現在時刻を取得して、ラベルに出力してみました。
できたこと
- Timezoneで時刻の取得
- 時刻の出力
- 並列処理
できなかったこと
- whileからスムーズに拔ける
- 動的にタイムゾーンを加えること
- Windowsの時計ぽいGUIにすること
プログラム
Pythonのコードです。
from kivy.app import App
from kivy.uix.label import Label
from kivy.uix.widget import Widget
from kivy.lang import Builder
from kivy.uix.switch import Switch
from kivy.uix.button import Button
import time
from datetime import datetime, date, timedelta
from pytz import timezone
from kivy.clock import Clock
import threading

class MainScreen(Widget):
    def __init__(self, **kwargs):
        super().__init__(**kwargs)

#3---ラベルの更新
    def update(self,dt):
            self.ids.lbjapantimes.text = str(self.outjapan)
            self.ids.lbustimes.text = str(self.output)
            self.ids.lbuktimes.text = str(self.outuk)

#2---datetimeの指定
    def main(self):
        while True:
            self.outjapan = datetime.now(timezone('Asia/Tokyo'))
            self.output = datetime.now(timezone('America/New_York'))
            self.outuk = datetime.now(timezone('Europe/London'))
            Clock.schedule_once(self.update)
#1---Threading
    def button_clicked(self):
        thread = threading.Thread(target=self.main)
        thread.start()

class TestApp(App):
    def __init__(self, **kwargs):
        super(TestApp, self).__init__(**kwargs)
        self.title = 'Test'

if __name__ == '__main__':
    TestApp().run()
以下は解説になります。
#1---Threading
    def button_clicked(self):
        thread = threading.Thread(target=self.main)
        thread.start()
1の部分では、ボタンをクリックしたら並列処理を走らせています。
#2---datetimeの指定
    def main(self):
        while True:
            self.outjapan = datetime.now(timezone('Asia/Tokyo'))
            self.output = datetime.now(timezone('America/New_York'))
            self.outuk = datetime.now(timezone('Europe/London'))
            Clock.schedule_once(self.update)
2の部分では、datetimeでLocalを指定して時間を取得しています。
#3---ラベルの更新
    def update(self,dt):
            self.ids.lbjapantimes.text = str(self.outjapan)
            self.ids.lbustimes.text = str(self.output)
            self.ids.lbuktimes.text = str(self.outuk)
3の部分ではラベルの更新を行っています。
以下は、Kvファイルです。
<MainScreen>:
    GridLayout:
        cols:3
        rows:2
        size: root.size

        Label:
            text: 'Japan'
        Label:
            text: 'US'
        Label:
            text: 'UK'
        Label:
            text: '00:00:00'
            id: lbjapantimes
        Label:
            text: '00:00:00'
            id: lbustimes
        Label:
            text: '00:00:00'
            id: lbuktimes
    Button:
        text: 'Start'
        on_press: root.button_clicked()
MainScreen:
【結果】
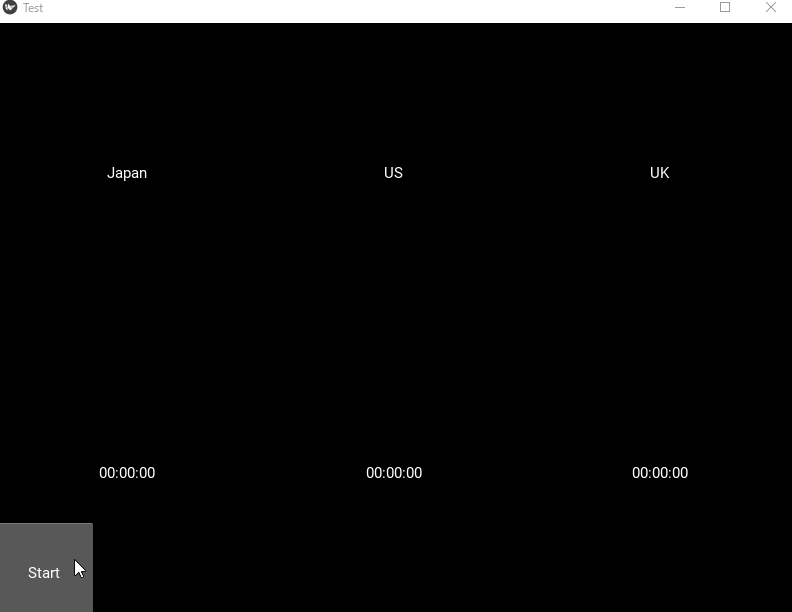
結果としては、値を取得して出力する事はできました。しかし、Windowsの時計アプリのように地図だったりできていないので、今後、改善していきたいと思っています。
改善してみた
from kivy.app import App
from kivy.uix.label import Label
from kivy.uix.widget import Widget
from kivy.lang import Builder
from kivy.uix.switch import Switch
from kivy.uix.button import Button
import time
from datetime import datetime, date, timedelta
from pytz import timezone
from kivy.clock import Clock
import threading

class MainScreen(Widget):
    def __init__(self, **kwargs):
        super().__init__(**kwargs)

    # ラベルの更新
    def update(self, dt):
        self.ids.lbjapantimes.text = str(self.outjapan.strftime('%H:%M:%S'))
        self.ids.lbustimes.text = str(self.output.strftime('%H:%M:%S'))
        self.ids.lbuktimes.text = str(self.outuk.strftime('%H:%M:%S'))

    # datetimeの指定
    def main(self):
        while True:
            self.outjapan = datetime.now(timezone('Asia/Tokyo'))
            self.output = datetime.now(timezone('America/New_York'))
            self.outuk = datetime.now(timezone('Europe/London'))
            Clock.schedule_once(self.update)

    # Threading
    def button_clicked(self):
        if self.ids.btn_start.text == 'Start':
            self.ids.btn_start.text = 'Stop'
            thread = threading.Thread(target=self.main)
            thread.start()
        else:
            self.ids.btn_start.text = 'Start'
            Clock.unschedule(self.update)

class TestApp(App):
    def __init__(self, **kwargs):
        super(TestApp, self).__init__(**kwargs)
        self.title = 'Timezone Clocks'

if __name__ == '__main__':
    TestApp().run()
桁の表示を整えて、Start/Stopの表示を追加しました。
Kvファイルは以下になります。
<MainScreen>:
    GridLayout:
        cols: 3
        rows: 2
        size: root.size
        padding: [20, 50]

        Label:
            text: 'Japan'
            font_size: '24sp'
            halign: 'center'
        Label:
            text: 'US'
            font_size: '24sp'
            halign: 'center'
        Label:
            text: 'UK'
            font_size: '24sp'
            halign: 'center'
        Label:
            text: '00:00:00'
            id: lbjapantimes
            font_size: '36sp'
            halign: 'center'
        Label:
            text: '00:00:00'
            id: lbustimes
            font_size: '36sp'
            halign: 'center'
        Label:
            text: '00:00:00'
            id: lbuktimes
            font_size: '36sp'
            halign: 'center'
    Button:
        id: btn_start
        text: 'Start'
        size_hint: (None, None)
        size: (100, 50)
        pos_hint: {'center_x': 0.5}
        on_press: root.button_clicked()

MainScreen:
【結果】
