今回のゴール

OpenWeatherMap(天気情報API)と連携し、都市名を入力すると天気情報を取得して表示するWebアプリをFlaskで作成します。
ステップ1:環境準備
必要なライブラリ
pip install flask requestsステップ2:プロジェクト構成
以下のような構成で作成します。
weather_app/
├── app.py
├── templates/
│   └── index.html
ステップ3:Flaskアプリ(app.py)
from flask import Flask, render_template, request
import requests

app = Flask(__name__)

API_KEY = 'YOUR_API_KEY'  # ← 実際のAPIキーに置き換えてください

@app.route('/', methods=['GET', 'POST'])
def index():
    weather_data = None
    error = None

    if request.method == 'POST':
        city = request.form.get('city')
        if not city:
            error = '都市名が未入力です。'
        else:
            url = f'https://api.openweathermap.org/data/2.5/weather?q={city}&appid={API_KEY}&units=metric&lang=ja'
            response = requests.get(url)

            if response.status_code == 200:
                data = response.json()
                weather_data = {
                    'city': city,
                    'temp': data['main']['temp'],
                    'description': data['weather'][0]['description'],
                    'icon': data['weather'][0]['icon']
                }
            else:
                error = f'天気情報の取得に失敗しました。(ステータスコード: {response.status_code})'

    return render_template('index.html', weather=weather_data, error=error)

if __name__ == '__main__':
    app.run(debug=True)
ステップ4:HTMLテンプレート(templates/index.html)
<!DOCTYPE html>
<html lang="ja">
<head>
    <meta charset="UTF-8">
    <title>天気情報アプリ</title>
</head>
<body>
    <h1>天気情報アプリ</h1>

    <form method="POST">
        <input type="text" name="city" placeholder="都市名を入力" required>
        <button type="submit">検索</button>
    </form>

    {% if error %}
        <p style="color: red;">{{ error }}</p>
    {% endif %}

    {% if weather %}
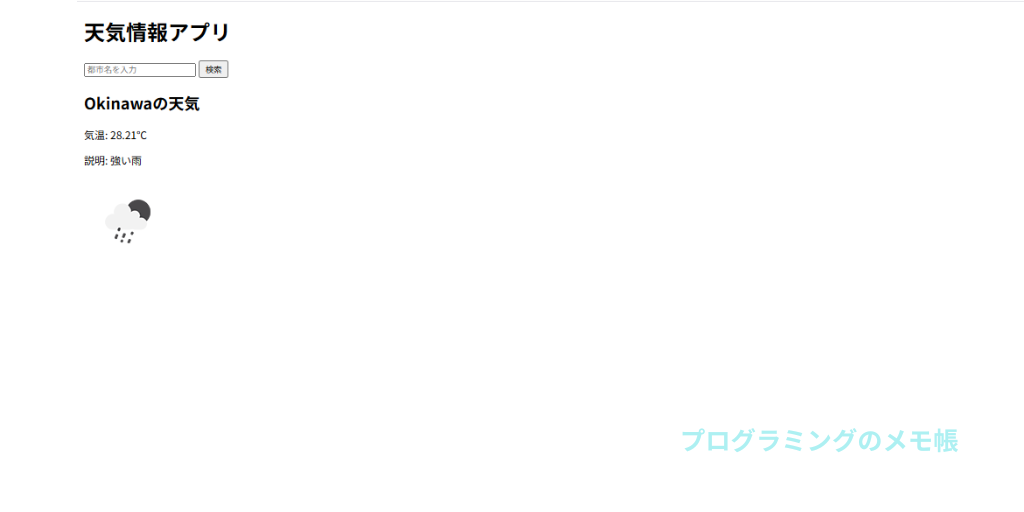
        <h2>{{ weather.city }}の天気</h2>
        <p>気温: {{ weather.temp }}℃</p>
        <p>説明: {{ weather.description }}</p>
        <img src="https://openweathermap.org/img/wn/{{ weather.icon }}@2x.png" alt="天気アイコン">
    {% endif %}
</body>
</html>
解説ポイント
requests.get(url)
- 天気APIにアクセスし、都市名に応じたJSON形式のデータを取得します。
data['main']['temp']
- APIから得たJSONの中から気温などの情報を抽出します。
render_template()
- HTMLに値を渡して動的に画面を表示できます。
OpenWeatherMapのAPIキー取得方法
- https://openweathermap.org/ にアクセス
- 無料アカウント作成
- 「API Keys」ページからAPIキーをコピー
実行方法
python app.py- ブラウザで
http://127.0.0.1:5000/にアクセス - 都市名(例:Tokyo, London)を入力して天気情報を表示
結果

まとめ
- Flaskと外部API連携の基本が理解できる
requestsライブラリの使い方が学べる- HTMLに値を渡して動的表示する方法がわかる

